
Introduction
In the landscape of Unreal Engine development, managing data tables effectively is crucial for both small and large-scale projects. The traditional approach, requiring developers to manually specify each data table in the C++ class header file, can lead to a cumbersome and time-consuming process. This guide introduces a streamlined method leveraging a singleton pattern for global access to data tables, thereby enhancing efficiency and organization in your Unreal Engine projects.
The Challenge: Manual Data Table Specification Per Class
The conventional method of accessing data tables in Unreal involves manually declaring each one in the corresponding C++ class header file. This process, while straightforward, quickly becomes tedious as your project scales, leading to a bloated and unwieldy codebase.
The Solution: Global Access via a Singleton Pattern
Adopting a singleton pattern for your game instance presents an elegant solution to this challenge. By creating a global access point to a custom game instance, you can manage all data tables through a single, centralized system, simplifying access and modification.
What is a Singleton
A singleton is a design pattern used in software development to ensure that a class has only one instance throughout the lifespan of an application, with a global point of access to that instance. This pattern is particularly useful in scenarios where multiple parts of a program need to access common functionality or data, such as a configuration manager, a connection pool, or, as in our case, a central repository for data tables in an Unreal Engine project.
Why Singletons Are Good
- Global Access: Singletons provide a globally accessible instance, ensuring that all parts of an application can access the singleton’s methods and data without needing to instantiate the class repeatedly.
- Controlled Access: By controlling the instantiation process, singletons ensure that only one instance of the class exists, preventing inconsistent states across the application.
- Lazy Initialization: Singletons can be lazily initialized, meaning the instance is created only when it is needed. This can improve the application’s startup time and reduce memory usage.
- Namespace Organization: They help in organizing global variables by keeping them together under a single class’s namespace rather than spreading them across the global scope.
The Dangers of Singletons
While singletons can be quite beneficial, they come with their own set of drawbacks that developers should be aware of:
- Global State: Singletons carry global state within an application, which can lead to hidden dependencies between classes, making the system harder to understand and modify.
- Testing Challenges: The global state held by singletons can make unit testing more challenging. Tests may become interdependent if they rely on the singleton’s state, leading to fragile tests that can fail in unpredictable ways.
- Concurrency Issues: In multithreaded applications, ensuring that the singleton remains thread-safe can introduce complexity. If not properly handled, it could lead to issues such as race conditions.
- Scalability Concerns: Singletons can hinder the scalability of an application since they promote tight coupling between classes and the singleton instance. This can make it difficult to extend or modify the application’s functionality without affecting the singleton.
Create a Custom Game Instance Class
For clarity and accuracy, let’s name our custom game instance UMyGameInstance. This class will serve as the foundation for our singleton pattern.
Define the Singleton
To ensure proper encapsulation and access control, we’ll declare the static instance variable CachedGameInstance in a private section of our UMyGameInstance header file, making the GetInstance function public for global access.
// In your UMyGameInstance header file
class UMyGameInstance : public UGameInstance
{
    GENERATED_BODY()


public:
    // Static getter function for the cached game instance, ensuring public access
    static UMyGameInstance* GetInstance();

    // Function declarations
    UDataTable* GetDataTable(const FName& DataTableID) const;

private:
    // Static member variable to store the cached game instance
    static UMyGameInstance* CachedGameInstance;
};
In the implementation, GetInstance checks for and returns the cached game instance, while Init initializes CachedGameInstance.
// In your UMyGameInstance implementation file
UMyGameInstance* UMyGameInstance::CachedGameInstance = nullptr;

UMyGameInstance* UMyGameInstance::GetInstance()
{
    return CachedGameInstance;
}

void UMyGameInstance::Init()
{
    Super::Init();
    CachedGameInstance = this;
}
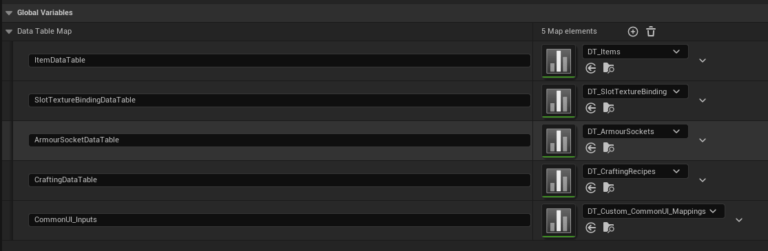
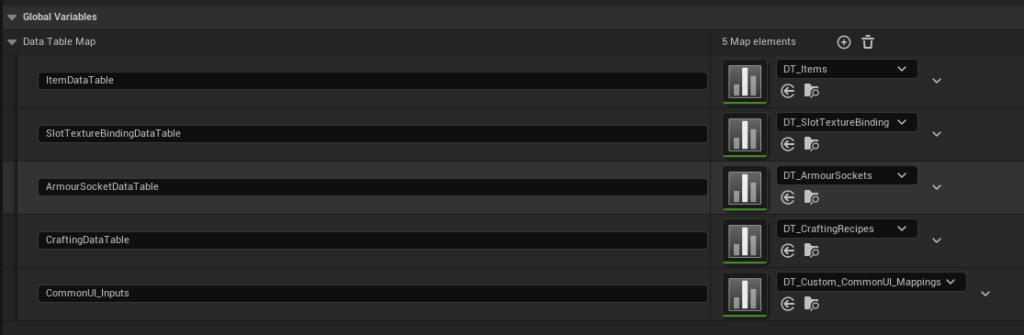
Manage Data Tables Through a TMap
Instead of individually declaring each data table, we’ll use a TMap. This allows dynamic management and access in code through a friendly name.
// Add to your UMyGameInstance header
UPROPERTY(BlueprintReadWrite, EditDefaultsOnly)
TMap<FName, UDataTable*> DataTableMap;
Implementing GetDataTable Function
Let’s implement the GetDataTable function you’ve provided to retrieve data tables by FName.
UDataTable* UMyGameInstance::GetDataTable(const FName& DataTableID) const
{
    if (!ensureMsgf(!DataTableID.IsNone(), TEXT("DataTableID is not valid!")))
    {
        return nullptr;
    }

    const UDataTable* const* FoundDataTablePtr = DataTableMap.Find(DataTableID);
    if (!ensureMsgf(FoundDataTablePtr, TEXT("GetDataTable: DataTableID '%s' not found in DataTableMap."), *DataTableID.ToString()))
    {
        return nullptr;
    }

    if (!ensureMsgf(*FoundDataTablePtr, TEXT("GetDataTable: DataTableID '%s' found, but the associated UDataTable* is nullptr."), *DataTableID.ToString()))
    {
        return nullptr;
    }

    // At this point, FoundDataTablePtr is guaranteed to be non-null and points to a non-null UDataTable
    return const_cast<UDataTable*>(*FoundDataTablePtr);
}
Accessing Data Tables Anywhere in Your Project
With the singleton and TMap setup, accessing a data table anywhere in your project is straightforward:
UDataTable* DataTable = UMyGameInstance::GetInstance()->GetDataTable(FName("YourDataTableName"));
They can be set within the MyGameInstance blueprint like in the example below:
Advantages of This Approach
- Efficiency and Time-Saving: Reduces the need for repetitive manual specification of data tables.
- Improved Organization: Centralizes data table management, making your codebase cleaner and more manageable.
- Enhanced Scalability: Easily add or remove data tables without cluttering your code.
Conclusion
By integrating a singleton pattern into your Unreal projects, you can significantly streamline the process of managing data tables. This approach not only saves time but also enhances the organization and scalability of your projects. As we’ve demonstrated, implementing a global access point for data tables through a custom game instance, like UMyGameInstance, offers a practical and efficient solution to a common development challenge.
This guide aims to provide you with the tools and knowledge to implement a more efficient data management system in your Unreal Engine projects. Here’s to making your development process smoother and more enjoyable!
Further Reading
Interested in optimizing your development workflow even further? Check out our post on Rider – The Best IDE for Game Development?. Discover why Rider might just be the game-changer you’re looking for in streamlining your game development process.